Showing posts with label yarn. Show all posts

Monday, 25 May 2015

V Cushion Love

Love my V cushion, Snuggly and comfy and just perfect to have my first cup of tea in the morning!
But the covers I bought for it were boring or too big and it was really the ugly duckling among the other pillows!!
Then I got Jan Eatons 200 Crochet Blocks book and had a brainwave! I would make samples of the blocks and cover my ugly pillow!


The colours I picked from my stash of Stylecraft Special DK were pale rose, aspen, cream, sherbet, peach, mocha and lilac. Parchment was chosen to join them all together.
I made 24 different squares. Each square is 15cm  (6") I used a 4mm hook.
This is just a selection of the patterns I picked:


 I blocked every one which really does improve how they look and makes joining so much easier!
I laid them out on the cushion to see which way was best.


I then decided that I would use a 3 chain braid to join them. This is a lovely, quick, neat joining method and brilliant for solid grannies. Bethinx 1 has a good tutorial on YouTube on this.


Coming together!

When I had both sides joined I joined them together by making a granny stitch gusset all the way around leaving the bottom of the cushion open.


Here I added another row of granny stitch then made a long chain which I threaded through to close the cushion and tied it with a bow.


Very pleased with how it looked! A vast improvement on its previous cover!

xxx Eirawen

Sunday, 4 January 2015

The Cathedral Motif

Happy New Year!
Early in December I saw a post on Instagram from poppyandbliss of a cushion she had made using the cathedral motif... it was lovely and I fell in love...
So I tried to find it (preferably for free!) It is available on Ravelry but not for free however I eventually found it on a blog by lostsentiments.
I decided I would like to cover my old footstool with it, so with that in mind I choose the colours of mocha, meadow, grape, gold and parchment in Stylecraft Special DK.The footstool measures 21" x12".
This is where I lost the plot and somehow... no idea how...I estimated I needed 48 squares! Now this is a small footstool so my alarm bells should have been ringing...but they were silent and off I went and made 48 squares! They took a while!

Such a very pretty motif!
Then I found I only needed 15... seriously... I need locking up... I could have cried!


All joined with parchment with the join-as-you-go method which is a little different with a solid granny square.
Ooana has a good tutorial on YouTube

Blocking before I start the border to fit the stool. You know how much I love to block!

This is where I thought I might have trouble making it fit and look nice.
On the first round I decreased at the corner by 3 stitches and this gave a really great corner shape... so happy!
Then decreased each row starting with every 5th stitch, then 4th, 3rd and 2nd which made a super fit.
Just to make it secure and not get rucked up by bottoms, feet or cats, I made a long chain and threaded it through the final row and fastened it tight with a bow.

Ta'Dah! So pleased with how this turned out and have enough squares left over to make some matching cushions... which is of course what I always intended...

xxx Eirawen

And here they are :)


Cushions are the easiest and quickest things to make and I will tell you how I made these.                                 
Each cushion needs 18 squares... 14 x cathedral motif and 4 x  three round solid grannies.
This makes the cushion have a different design on each side. There are 9 squares on each side and I have joined them in a continuous join as you go. If you are stitching them together or some other crochet join you need to add a round of trebles to both the cathedral motif and the solid granny. 

This is the pattern for the solid granny square:

4ch, sl st to join ( or magic circle)
1. 3ch 2tr, 2ch 3tr, repeat twice more until 4 corners, sl st to join.
2. 3ch, tr into each tr, 2tr 4ch 2tr in each corner, sl st to join.
3.Repeat round 2
4 Repeat round 2 (OMIT THIS ROUND IF JAYG)


Once all the squares were joined I added 2 rows of trebles around the whole edge to give the size I wanted (14" x 14"). Now they are ready to join together.  So many ways depending on the effect you want. You can crochet them or stitch them , whatever you fancy! I joined mine with a simple slip stitch . You get a slight raised edge which looks very neat.


I left an opening at the bottom for the cushion insert and then made a chain of 130 to close the bottom with. I doubled it over to give more strength that is why it is so long! Then using a darning needle I threaded it through and closed it with a bow.


This makes a 14" x 14 " cover and will need a 16" x 16" insert to plump it out properly!   

I am so pleased with these they look so pretty and elegant in these colours. 

xx Eirawen
    

Friday, 31 October 2014

Crochet Poppy

Yesterday I went with my son and daughter to see the Blood Swept Lands and Seas of Red poppy installation at the Tower of London.


This wonderful work by artist Paul Cummins is to remember the sacrifice made by British and Commonwealth soldiers in the First World War. It was a very poignant yet remarkable sight and I feel very lucky to have been able to see it.
Today whilst contemplating our visit yesterday I decided to have a go at making a crochet poppy. I have donated as usual to the British Legion Poppy Appeal but the little paper poppies don't tend to look good for long. I have looked at many poppy patterns over the years but never found one completely to my liking so  thought I would try and make my own!

To make this pattern you will need a knowledge of the following stitches:

Double crochet
Half Treble crochet
Treble crochet
Double Treble crochet

You will need a small amount of red and green yarn (I used Stylecraft lipstick and willow), 4mm crochet hook, scissors, a tapestry needle, black button and a brooch back.
First make a magic circle and do 10 dc, ss to join.
1ch 1dc into same space then 2dc into each stitch (20dc) ss to join


3ch 1dtc into same space, 1dtc, 2 dtc repeat x 4, 3 ch, ss into next stitch and ch 3.


That's your first petal shape and you continue the pattern for the second petal. So starting with the last chain 3 you will do a dtc in the same space then 1dtc, 2 dtc repeat x 4 and ch3.
Each petal has a ch3, 13 dtc, ch3,
Hope you can follow this as I am not a pattern writer!
Leave a good length of yarn for sewing up later.


Make a second one of these to form your poppy.
Now for the leaf.
Ch 10, 1dc into 1st stitch from hook then 1htc, 1tc, 3dtc, 1tc, 1htc, 1dc, 1ch then continue up the opposite side repeating this pattern and finish with a ss into first dc.
Sew on the button first then add one flower petal onto the other at different angles.


Sew on the leaf. Now traditionally the leaf should be in the 11 o clock position so you may want to keep this in mind when placing your leaf.


Add the brooch back


And there you have it!


Different buttons alter the look...
Don't forget to still donate to the British Legion while wearing your super handmade poppy!

xxx Eirawen

Tuesday, 9 September 2014

Big Bang Theory Crochet Blanket Part 1

We love the TV show Big Bang Theory in our house. Now I started watching it a few years ago on late night TV then it became  tea time TV and the Beloved became hooked so we could watch it loads!!
Who doesn't love Amy Farrar Fowler's crochet blanket and of course Sheldon x


I have literally spent hours and hours looking at the few pictures out there trying to work out a pattern to make the blanket.

It will be by no means an identical replica of the blanket, that I think is impossible, but the most important bit I think is to have the red triangle shapes on the four sides.
Hopefully it will look similar  and be recognisable as a homage to the original blanket.
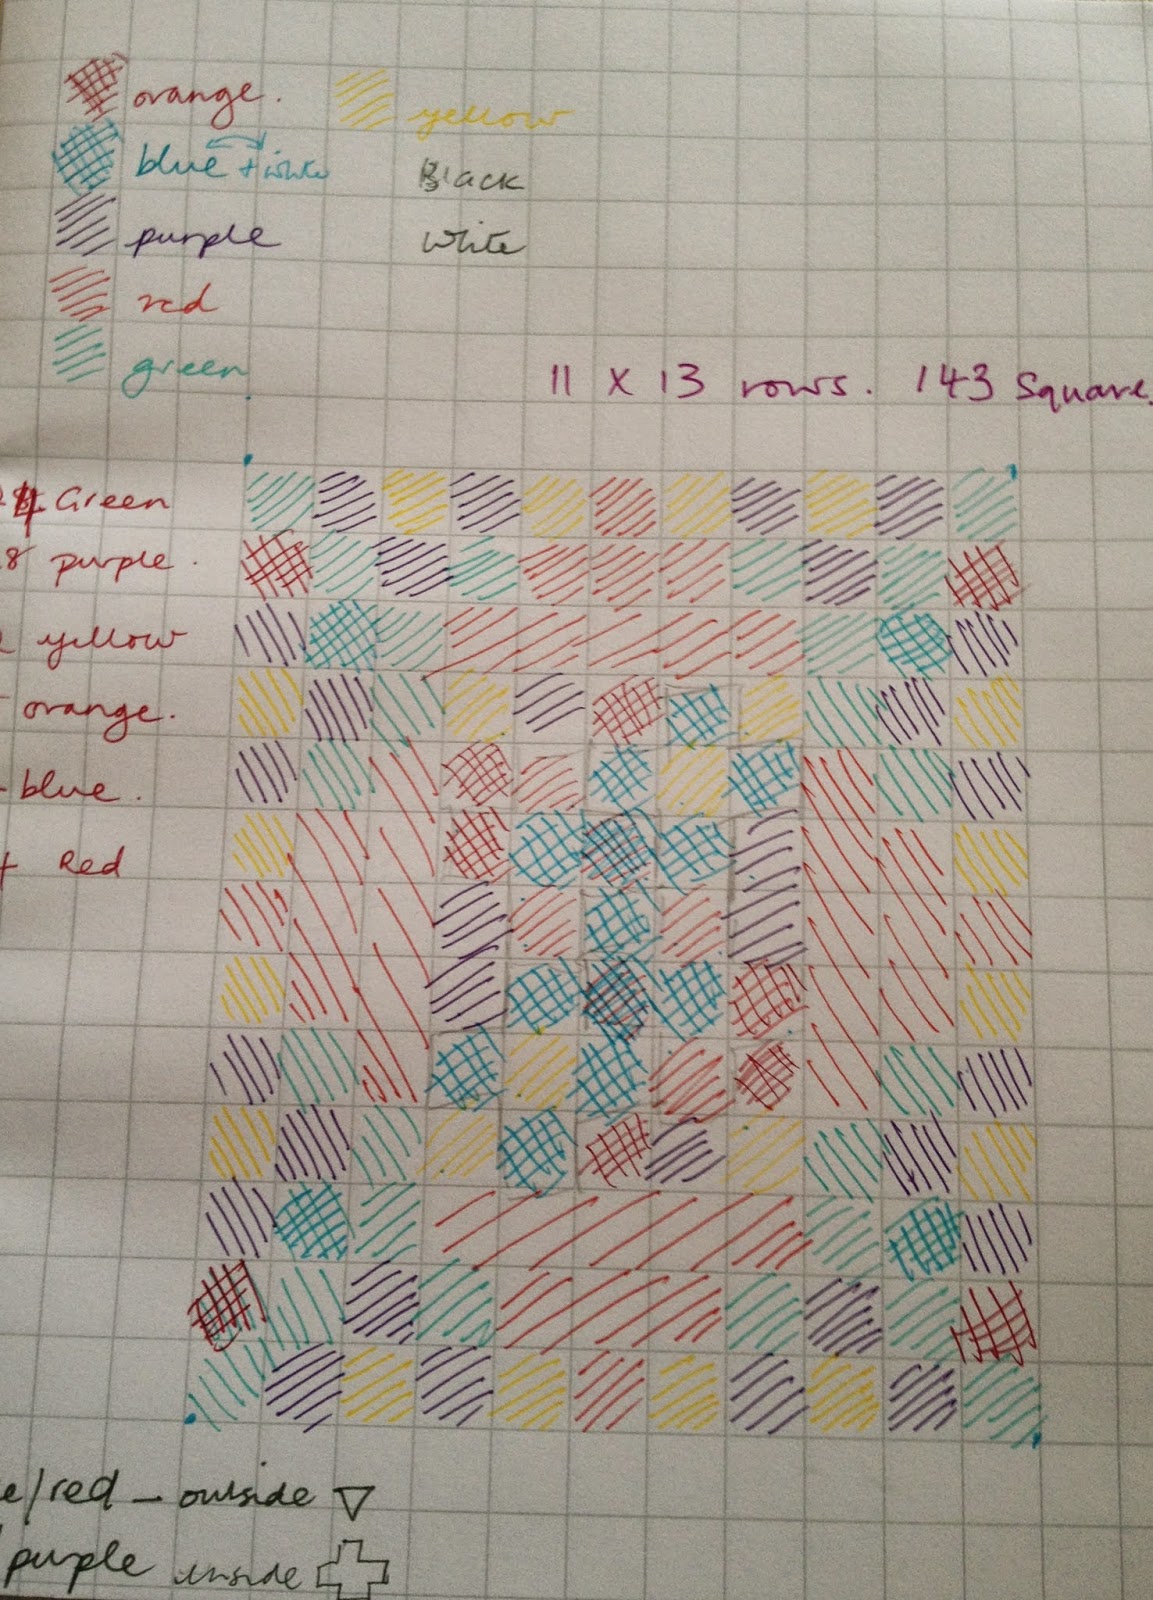
This will be one of my biggest projects to date! Approx 143 squares!!! Or more.
I have ordered some extra yarn for the colours I was missing... mainly red and we are good to go!

Thinking at the moment black, lemon, parchment, willow, aster, pale rose, gold, wisteria, plum and lipstick in Stylecraft Special DK and a 4mm hook.


Classic granny square design.


Apologies for the quality of the picture!

Wish me luck and hopefully not too long to the next instalment!

xxx Eirawen

Friday, 5 September 2014

Frozen Stars

I love the flowers in the snow pattern by Solstrikke. It is simple yet very effective and can look very different depending upon whether you use few or many colours.
Its a while since I made anything with this pattern so decided it was time for a revisit!
I decided on a cool colour palette.

Stylecraft Special DK in white, bluebell, silver, graphite and sherbet and a 4mm hook.

This is the finished circle to square. I will be omitting the final round of turning the circle to square as I will join as I go. The flowers in the snow pattern by Solstrikke is here.

48 circles later...
I used three different pattern colour ways:
Top-2nd and 3rd row same colour.
Middle- 3 different colours
Bottom-2 diffent colours
I went for a random pattern... always so difficult as it doesn't matter how much you scan the rows you are bound to find one in the wrong place after joining! I am also a symmetrical girl and this made my eye twitch but I persevered!

Ok all ready to join. Join as you go here we come... Attic24 has a good tutorial on this.


 It is just so neat!


I did a block stitch border of 11 rows and then a 3 chain braid to finish. Simples!

This was going to be a very exciting blocking moment as my new blocking boards had arrived. I had ordered 12 as they are sold individually and at a cost of £4 a block not a cheap investment but they did not disappoint! These are Boye Crochet Dude blocking boards.They have a grid and are 12x12" square. I got mine from http://www.carolescraftsuk.co.uk/  with free shipping.

Sooo much easier than running round the table with a tape measure and it seemed to dry much quicker too... result!!


Ta'Dah!

Blanket size 100x80cms. I wanted to give this blanket a 'cool' name and toyed with arctic sea, winter's night, snow queen etc then it was suggested on Instagram to call it Frozen Stars... I liked that :)

xxx Eirawen